Adam Rosen I am a vintage Mac collector in the Boston, MA, US area, and an Apple Certified Macintosh consultant doing business under the name Oakbog. I've been using Macs for over three decades and counting!
This is a guest post by Henry Plain, vintage Mac restoration specialist
—
TAMs! Those who own ’em love ’em, those who don’t love ’em even more!
If you know anything about TAMs, you know that they are one of the most expensive, sought after and unique Macs ever produced. To this day they are the only mass produced anniversary Macs ever made. With an extremely limited build number, a plethora of accessories, boxes and gadgets they are collectors dream or nightmare. Sadly, service parts for these amazing machines are few and far between.
Even worse is the symptom all of these wonderful machines will ultimately suffer, commonly referred to as the TAM Bose Buzz. If you’ve heard it, it sounds like nails on a chalk board; well not literally, but compared to the blissful silence TAMs normally operate with it might as well be! First it starts off faint, unsuspecting and almost unnoticeable, until it manifests itself further and you’ve got a full on screaming banshee on your hands.
What causes the issue is a common problem with many old electronics: oxidation of electrical contacts.
If you’re handy with a soldering iron – and are comfortable working with electronics – the fix is fairly simple. If not, find a qualified geek friend or a professional to help.
First you need to take apart the Bose subwoofer/power module. Here’s a teardown guide. Once you’ve got everything opened up, follow this process:
• remove the power board from the inside of the Bose unit.
• with the board removed, using solder, tin the leads on the red/green speaker wire connector (3 prongs) so the contacts cannot oxidize.
• again with solder, tin the leads on the power cable connectors on the opposite side of the board (12 prongs) so those contacts also cannot oxidize.
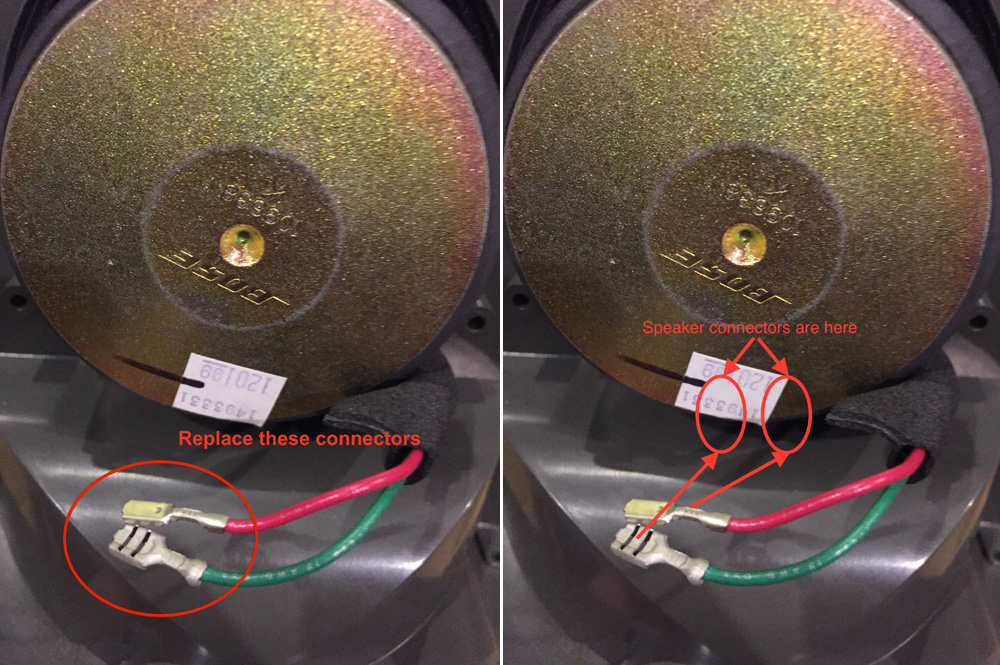
• finally, remove the green and red speaker wires that connect to the Bose subwoofer, and cut off the old terminal connectors. Notice any oxidization or pits on the old connectors? That’s part of the buzzing culprit.
• strip the leads, and crimp on new, coated speaker terminal connectors (available from most electronics stores). Then reconnect the cables to subwoofer.
• that’s all there is – reassemble your Bose bass unit and enjoy the sound of silence!
One of the most rewarding tasks I perform working with vintage Macs is restoring artifacts and memories of days past. Many of the floppy disks and other media I receive for transfer and conversion contain more than just files, they contain pieces of people’s lives. One poignant but challenging recent job involved some old multimedia software called VideoWorks, and was an all-hands-on-deck affair for both vintage and modern Apple hardware.
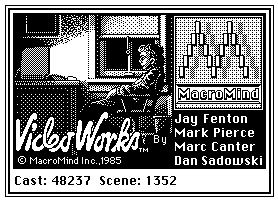
MacroMind VideoWorks was a multimedia animation program available for the early Macintosh; it was the first version of what eventually became known as Macromedia Director. While the black & white graphics and 8 bit sound on these early Macs are primitive by today’s standards, they were impressive in the mid 1980s. I think the artwork in the About VideoWorks dialog box is an ideal depiction of how entrancing this capability could be.
This particular conversion job involved a floppy disk full of old movie files. They were created by a young man while he was in high school, and copies were given to a friend to enjoy on her Macintosh. Sadly, the young man passed away a few years later, and the disk was one of the few things she had left as a memento. Was there some way I could access the files and convert them to be viewable on modern computers?
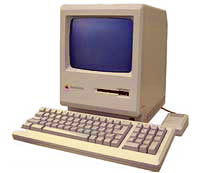
I received the disk and found that the files were in VideoWorks format. I have a copy of this software, and after a bit of experimentation found that they would play on my Mac Plus running System 6. The sound wasn’t working correctly and playback was a bit pokey, but it was a start! After two decades in a desk drawer, some very charming clips of a jet airplane flying around and a skier eaten by an abominable snowman were again floating around on screen.
I remember playing with VideoWorks back in the day. And a few years later, using Director for some interactive multimedia work. Memories…
OK, now how to convert these clips into something useable. Any Save As… or Export… options? Nope. Perhaps Director can import the files, then save to QuickTime? No such luck, doesn’t recognize them at all. Nobody really anticipated that these files would need to get converted back in those days. What to do now?
Fallback to Plan B: Use Analog. Point a video camera at the Mac screen, and record the playback.
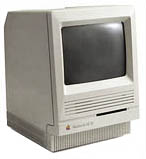
I decided to try using an SE/30 for better playback. To transfer the files and software my Mac Plus relayed the files to a PowerBook 540c using LocalTalk (over phone wires – remember those days?) That system in turn can share files over Ethernet, and the SE/30 has an ethernet card installed, so away we go. The PB540 is called a “bridge machine” in this context. Three computers used so far.
The SE/30 had enough processing power to play the movies but this machine quickly began acting very flaky. First it refused to boot until plugged in for about half an hour. Then it began generating hum and distortion in the audio output while the movies were playing. Eventually it began rebooting itself randomly. Such is life working with old hardware.
I put that Mac aside for repairs and pulled out my backup SE/30 (doesn’t everyone have one?) to get the job done. Four machines. The backup SE/30 ran fine, but on this one the sound was barely audible. I don’t remember having any audio problems before… Sigh… The solution: connect a pair of powered speakers to the audio out jack and adjust until the volume was loud enough to use. Five pieces of gear.
To record playback I used my iPhone in video mode. Constructing a Rube Goldberg’esque pile of boxes, tiles, business cards and an iPhone car mounting bracket, I made a stand for the phone and set it at the closest distance that would focus on the screen. Not exactly a high end video conversion, but it was sufficient for the task. Six pieces of equipment.
Finally after a few false starts, and some nudged equipment by a rather curious feline, I had all the movies recorded. Time to jump forward a few decades and copy the files onto a modern Intel iMac running OS X. Some quick editing in QuickTime Player Pro trims the heads and tails, then I exported the final clips as MPEG files for playback on current computing hardware. Seven items – and that’s not counting the Mac Mini being used as an FTP server to deliver the final media!
But all this effort is worthwhile. Here’s an excerpt from one of the movies (posted with permission):
The clips are charming, funny, and show the progress of our young filmmaker learning how to use his tools. They are a moment in technological history, but also priceless memories to his family and friends who watched and laughed at these movies during days past. This feedback that I received from my client really sums it all up:
I can’t thank you enough for all the hard work you’ve put into this. I don’t think you realize what a special thing this will be for all of the people who knew [him].
This is a big reason why I work to keep these old machines alive.
Apple is a mobility company these days, and iDevices are all the rage. With the iPhone their bestselling product and the iPad in a comfortable second place, it’s not surprising the Mac has taken a back seat.
So it was a pleasant surprise for many of us Apple veterans to see the mothership giving a nod to our old friend with their latest MacBook Air ad, Stickers – an audio/visual collage of custom stickers on the backs of MacBooks. New Macs, old Macs, scratched and dented Macs, this is how we use our trusted friends:
Nice spot. A technology is truly ubiquitous when it recedes into the background and becomes part of the furniture. Even better, a flash of the six color Apple logo at the end. My goodness, how nostalgic!
In related news, MacBook sticker sellers report a large increase in sales since this ad began airing…
During the late 1990s and early 2000s the Macintosh was getting more powerful, and for a while the PowerPC G-series CPUs provided more computing power than comparable Intel chips. But by the middle of that decade the G5 was reaching an engineering tradeoff in terms of processing power versus thermal output; the fastest Macs ran very hot and required the development of liquid cooling systems. These limitations prevented the release of G5 based PowerBooks (though prototypes were rumored to exist), and required Apple to think differently about its future.
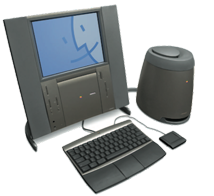
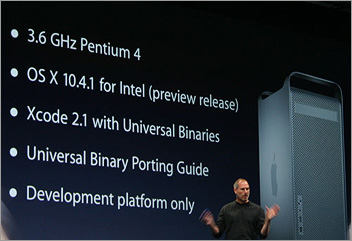
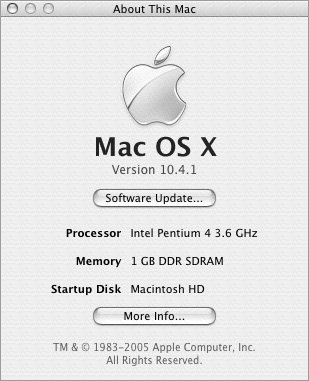
So in 2006 Apple stunned the world (again) by announcing they were going over to the Dark Side: the Macintosh was going to switch to Intel processors. Apple had been secretly compiling Mac OS X for Intel shortly after it’s evolution from NeXTstep. To allow developers to prepare their own software for the change, Apple designed special Macs with Pentium-based motherboards inside PowerMac G5 cases for testing purposes. Called Developer Transition Systems (DTS), these Trojan horse “PowerMacs” came with a special developer version of Mac OS X Tiger 10.4.1 for Intel and were leased, not sold, to developers. The mothership required all DTS units to be returned after one year, so very few of these hybrid Macs survive outside the gates of Cupertino.
The DTS is an interesting beast. A small logic board labelled Barracuda sits inside a ridiculously large tower (to fool the passers-by). The processor is a 3.6GHz Pentium 4 with Hyper-Threading. But despite being an Intel version of Mac OS X Universal applications will not launch in Intel mode, they just bounce a few times in the dock then abort. In order to launch third party software you need to check the preference to “Launch using Rosetta” in the Finder’s Get Info window. As far as these apps are concerned, they’re still running in a PowerPC world.
When you first start the machine a BIOS screen appears, allowing you to hit F4 and set the boot drive order, system date, etc.. No Open Firmware here. Unlike other Macs the hard drive needs to be partitioned using Master Boot Record (MBR), not GUID as used for all shipping Intel-based Macs. That’s unique. This thing is really a PC with proprietary software pasted on top. Look at all those Pentium 4 CPU features!
As a VMM addition, this was a real find. I got system from used Mac shop that keeps an eye out for interesting items; they got it from someone who was going to dispose of the tower as scrap metal. Fortunately that fate was avoided and the DTS arrived in working condition, but it did not have a copy of Mac OS X installed. The previous owner had used the tower as a (shudder) Windows XP machine and erased the Apple development software. Noooooo!!!!
Finding a copy of the necessary software and then getting it to run on this system proved a bit of a challenge. That’s an understatement. These puppies require serious determination to bring back to life.
The magic system necessary is Mac OS X build 8b1025. After a few months I was lucky to get help from fellow Mac collector (and Prototype Man) Henry “Hap” Plain, who found a copy after locating a working DTS himself. But making drives from the disk image files he sent was unsuccessful, I couldn’t get my machine to boot. Multiple swapping of hard drives followed. After several tries we resorted to shipping drives across the country, and that finally worked. At last the mythical 10.4.1 on Intel was running live in front of me!
But I couldn’t duplicate the setup for backup purposes. This is an important part of keeping vintage computers working. Clones made of the startup disk would not boot the machine, they stalled at a black screen with a blinking cursor. More weeks of experimentation. More hard disks in and out. Let me tell you the drive slots on the G5 (err, DTS) tower are really annoying to deal with, they make me appreciate the Mac Pro design even more.
Damn it Apple, why are you making this (never-intended-to-be-released-to-the-public) system so difficult to restore? Never mind, don’t answer that.
Eventually Hap managed to locate an image of the actual 10.4.1 install DVD that shipped with the towers from from Apple (I’m very jealous of his connections). This works better: with the DVD you can easily install OS X on the hard disk and reliably make the DTS come to life. But wait! Don’t put that installer away after installation, it also contains a boot loader necessary get the hard drive up and running. I’ve found that I need to keep the DVD in place in order to boot up the machine, otherwise it’s back to a blinking cursor.
As noted, this is not your Grandfather’s Macintosh. DTS, welcome to the VMM.
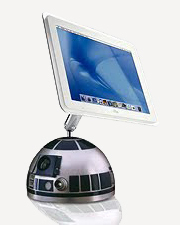
In 1976 Apple ignited the personal computer revolution. In 1996 Apple Computer turned twenty years old. To commemorate the occasion, the company released a limited edition Twentieth Anniversary Macintosh – affectionately known as the TAM among Apple collectors and aficionados.
The TAM represented Apple’s design vision for the future. It included a flat panel screen with a vertical orientation, the computer was incorporated into the monitor. While this is the standard form factor of the iMac line today, in the 1990s this design was very groundbreaking. Advanced capabilities included a TV tuner, FM radio, a custom designed Bose sound system (with subwoofer), and a removable trackpad in place of a mouse.
Unlike the beige Macs of the day, the TAM was colored a brown-grey hue similar to the PowerBook. It was also priced at $7500. Initial units were individually hand-delivered to customers and setup by a tech-in-a-tux! I’ll bet they even came with a jar of Grey Poupon.
However while visually striking, the TAM wasn’t a hit among buyers. The CPU was a middle-of-the-road 250MHz PowerPC 603, the computer didn’t include ethernet, had limited expansion capability, and was unaffordable to all but the most affluent of buyers. Sales languished and Apple lowered the price several times. It finally dropped to as low as $1995 before the company pulled the plug a year later. Personally I remember scoffing at the TAM as an overpriced, underpowered status symbol when it was released, and didn’t feel it was worthy of ownership nor inclusion in the Vintage Mac Museum.
Fast forward two decades, and the TAM appears quite differently. In retrospect this computer is clearly the ancestor of the flat-panel iMac. Starting with the iMac G5 and continuing to the present day, the design of Apple’s desktop-for-the-masses harkens directly back to the TAM. It is also an early Jony Ive influenced product, one championed by former Director of Industrial Design Robert Brunner before Steve Jobs returned to Apple in 1997.
Today the TAM has become a coveted collector’s item, and sells for $1000 (or more) on eBay if in good condition with original packaging. With age and wisdom I began to feel that it was indeed a model which should be included in the collection. Recently through a series of good circumstances and a few mutual favors, I’ve finally managed to acquire one.
My TAM came with it’s original packaging, a large outer box with four inner cartons numbered in the order they should be opened. After wrestling the quite sizable shipping carton home in my small hatchback, I did the whole unboxing thing in numerical order and hooked everything up.
It’s quite rare that I sit down in front of a vintage Mac I’ve never used before. This one feels like using a primordial iMac, made from a rearranged pre-G3 PowerBook. The curved stand and bracket which holds the computer allows it to be pivoted forward or backward to nearly any angle desired, and it does sound quite nice. The 12-inch active-matrix display screen is bright and crisp.
The TAM has a unique startup sound. I’m not sure this really works, the Mac’s standard startup chime through that audio system would be quite impressive. But reflecting the decade in which it was designed, a huge multipin connector links the computer to the subwoofer, which also serves as the power supply. Apple would never do that now, the subwoofer would just be connected via Bluetooth.
Wait, what am I saying? There wouldn’t be a subwoofer at all, but rather enhanced low frequency output from incredibly small speakers in the computer itself using Apple’s proprietary iFeel™ technology…
I’m very happy to finally have a TAM in the VMM family. The PowerPC Beige Collection page has been updated appropriately. A big thanks to Hap and Matt for their help to make this acquisition possible!
Every collection has some truly unique or special items. These are things you show off to other collectors and tirelessly hunt down in your spare time. For the first time in many years I’ve expanded the Collection categories for the Vintage Mac Museum. Introducing the Rare Items page. This is the place to highlight some of the custom or more unusual pieces in the collection, including:
• Apple Lisa 2 with X/Profile Compact Flash adapter
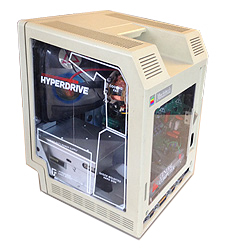
• Clear Sided Mac 512k, a former GCC HyperDrive demo model
• Macintosh Picasso Dealer Sign and packaging materials
• Apple eMate, end of the line for the Newton (but the start of the iBook)
• Gemini iBook, a custom touch screen Macintosh tablet for the disabled
• Axiotron Modbook, another Mac tablet mod for general industry and a very special recent addition
• Mac OS X Developer Transition System, a Trojan horse PowerMac G5
As the Museum has expanded people often ask me “what are you still looking for”? I’ve acquired many of the standard Mac collectibles I wish to have, so usually my standard answer is something like “I’m not sure but I’ll recognize it when I see it”.
The Rare Items page is a good sampling of such objects. Take a look, and let me know what you think!
 TAMs! Those who own ’em love ’em, those who don’t love ’em even more!
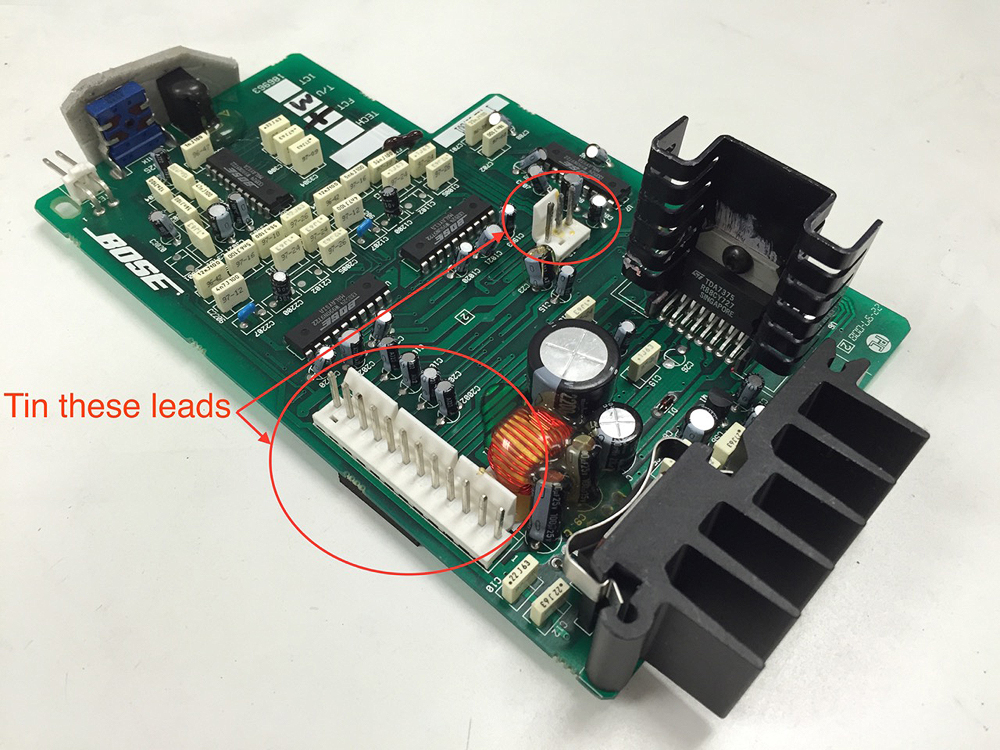


 The DTS is an interesting beast. A small logic board labelled Barracuda sits inside a ridiculously large tower (to fool the passers-by). The processor is a 3.6GHz Pentium 4 with Hyper-Threading. But despite being an Intel version of Mac OS X Universal applications will not launch in Intel mode, they just bounce a few times in the dock then abort. In order to launch third party software you need to check the preference to “Launch using Rosetta” in the Finder’s Get Info window. As far as these apps are concerned, they’re still running in a PowerPC world.
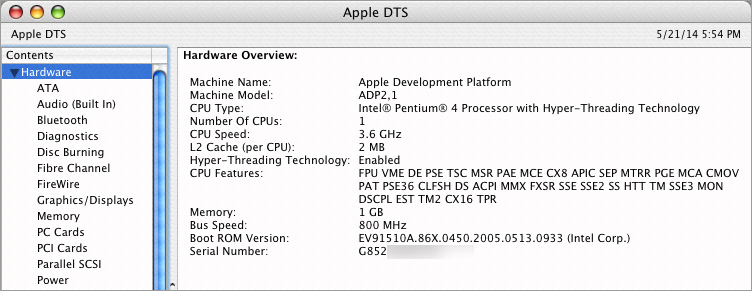
 The magic system necessary is Mac OS X build 8b1025. After a few months I was lucky to get help from fellow Mac collector (and
 This is the place to highlight some of the custom or more unusual pieces in the collection, including: