Most of the file conversion work I do results in electronic output – converting MacWrite files to Word .doc format, or MacPaint files to JPEG. Occasionally I get requests to work with old software that doesn’t have any kind of Save As… or Export option,  so the tried and true method of printing things to hard copy becomes the fallback method of last resort.
Recently I was contacted by someone wanting printouts of several HyperCard stacks containing her family genealogy. She was interested in entering the information into more current software, but needed to see the old stacks first. I have HyperCard so she sent the disks along.
Last year I inherited an Apple LaserWriter IIg into the collection, a somewhat ornery beast. I’ve gotten it working in the past but the printer has become cantankerous again, and now keeps jamming despite my best cleaning, coaxing, cursing and whacking attempts. I may need to find a replacement, or someone who still knows how to service these old behemoths. Meanwhile I had floppy disks in hand and had promised my client paper printouts.
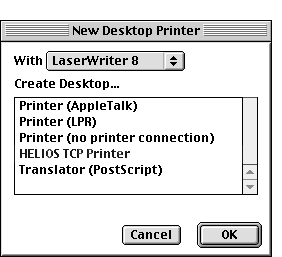
Having been faced with this dilemma before, I used the little-known Apple Desktop Printer Utility for Mac OS 9 to create a generic Desktop Printer with the output set as Translator (Postscript). This creates an icon on the desktop and makes the virtual printer available through the Chooser.
Once created you can open HyperCard (or any other software) and utilize the Print command or any embedded printing scripts. The printer output is a file named Untitled.ps on the desktop, which is easily renamed and copied to other computers.
PostScript files are useful things to have under Mac OS X, as Display PostScript is part of the system graphics protocol. The .ps files can be opened in Preview then printed directly from there, or – even better – saved to PDF format! Now instead of only having one hard copy and mailing that across country, I can email a PDF file which my client can open on her own system and print out as needed.
Desktop Printing without a printer. Who’da thunk it?
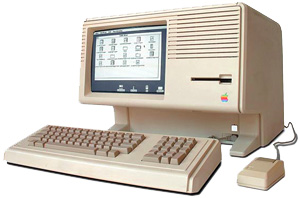
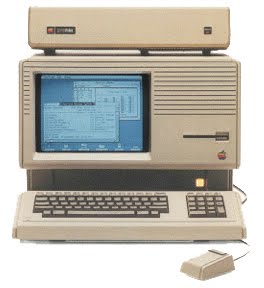
Regular readers of this blog may remember that I’ve been slowly working on bringing an Apple Lisa back to life. The mother of the Macintosh, the Lisa was the first commercial computer with a Graphical User Interface (GUI) and introduced windows, menus and the mouse to the world.
I inherited two models just about three years back, both of which powered up but that’s about it. Neither one contained a working floppy drive, hard drive, or keyboard. The last two items are (of course) non-standard parts. At the rapid rate of about a half day of effort every 18 months, I’ve ambled through a slow odyssey that’s included buying two keyboards, an external Apple ProFile drive, and a rare Lisa X/ProFile hard drive adapter, in order to get a (mostly) working system.
Fortunately there isn’t much urgency for this project.
Finding a keyboard was the first challenge. The Lisa uses a custom keyboard with a 1/4″ TRS (phone) connector rather than DIN plugs or anything standard for the era. No replacement units will work. And the internal foam pads tend to deteriorate over time, making various keys non-functional.
Lisa keyboards can be hard to find. I initially bought one from a fellow collector in Germany, it worked when he sent it out but was non-functional by the time I received it. A few months later I found another on eBay, from a woman who had only a keyboard but not the computer. This one worked upon receipt. My free Lisas now cost $400. Attempting to reinstall the OS would be the next challenge.
Both Lisas included internal Apple Widget hard drives – another proprietary part. These either didn’t spin up at all or intermittently showed signs of life, making those unique squeals of complaint that extremely old hard drives do when they deign to work at all. My hope was to reformat one of them and reinstall the Lisa OS from floppy disk.
The Lisa 2 (second generation) used the same 400k 3.5″ disks as the original 128k Macintosh. These drives are not particularly rare but tend to freeze up over time, requiring teardown and relubrication. The only non-frozen 400k drive I have is installed in my Mac 512k. I have a box full of frozen drives waiting for servicing in my attic, but as I get to this task about as regularly as weeding my rear yard (ask my neighbors) the project stalled yet again.
Over the next year or so I wound up selling one of the partially working Lisas for some extra cash, then subsequently purchased a working external ProFile drive. The ProFile is an even older Apple product, the company’s first ever external hard drive. This drive was sold with the Apple III and the original Lisa 1 with Twiggy floppy drives, and it sat on top of the systems.
Psyched that a breakthrough step was upon me, I tried to connect the ProFile to my working Lisa. The ProFile has a DB-25 parallel port connector. The Lisa has two DB-25 ports on the rear panel. Yup, 25 pin – serial – ports. Ugh. The Widget hard drive is connected as a parallel drive internally, but there are only serial ports externally. Foiled again. Sigh…
Fast forward to the present. While writing for Cult of Mac I wound up interviewing another vintage Mac and Lisa collector, a knowledgeable fellow also named Adam. After explaining my dilemma it turned out he had a spare X/ProFile hard drive adapter – perhaps one of the most useful items a Lisa owner can possess.
The X/ProFile is a custom circuit board that replaces the internal Widget drive and provides connectors for a Compact Flash card or IDE hard drive. This allows for the use of modern storage media with your vintage computer. It’s a great idea and very well designed, utilizing existing mounting holes and shipping with clear documentation. Kudos to James MacPhail of Sigma 7 Systems for making such a valuable product available. I wish there was a SCSI equivalent for old Macs.
My X/ProFile arrived with a copy of LisaOS 2.0 on CF card. I installed the unit, powered things up, and voila! For the first time in probably about two decades, my Lisa completed the startup sequence and booted to the desktop. And it’s completely silent now too, with the old hard drive and the cooling fan removed.
Yay! It works! Definitely time for a libation.
Well, it mostly works. It’s excruciatingly slow – like 10 minutes elapsing between double clicking on a folder and a window opening up. After some querying I’ve been told that this is because I only have a single 512k RAM card installed my unit, two cards are required for adequate performance. Of course. Now I wish I hadn’t sold that spare unit. Also the Return key on the keyboard has now stopped working, and I still don’t have a working floppy drive.
Looks like I now need to find a second RAM card. I figure that should take about another 18 months…
Security isn’t much of a concern when working with vintage Macs, but it’s something to take seriously with modern systems. Some recent suspicious incidents on my Mac Pro led me to suspect my system had somehow been compromised. Little did I realize the true culprit.
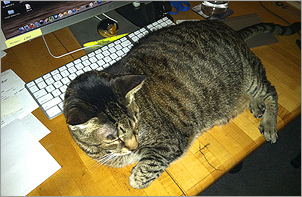 My home office Mac Pro sits on the floor, with a monitor, keyboard and trackpad on my desk. One of my companions is a big, sweet lug of a cat named Fudge. Like many felines Fudge likes to install himself in front of the computer monitor, and he’s been known to sit on the keyboard or trackpad in this position, which can cause a constant “mouse-down” or Control-key press. Usually it takes a few seconds for me to realize what’s going on, then I shuffle him away or move the equipment.
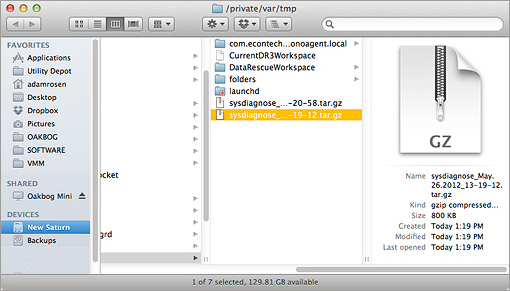
One day a few weeks ago Fudge hopped up, staked himself in front of the computer and made himself comfortable. I was in the middle of typing an email so I put him on his co-pilot’s chair next to mine (to his chagrin) and continued working. About 5 minutes later a window popped open in the Finder, showing a normally hidden directory named /private/var/tmp.
This was unusual, both in that the window popped up on its own, and in what it was displaying. /private/var/tmp is one of a set of directories setup by the UNIX (or Darwin) layer of Mac OS X; it’s invisible and not typically accessed in standard Macintosh operations. Inside this directory was some kind of system diagnostic file and other information about my setup. I’d never seen this happen before.
I took a screen snapshot of the situation and continued my work. Nothing else odd happened for the next couple days, so I put the incident aside as a low priority curiosity.
A few weeks later I was playing another round of the block-the-computer game with Fudge, and he again sat on the keyboard. I moved him to a chair, then a few minutes later BAM up pops the /private/var/tmp window. OK there’s something going on, and Fudge sitting on the keyboard seems to have some connection.
The sysdiagnose report that was highlighted was a very comprehensive document, or rather a compressed set of documents, like a System Profiler report on steroids. It’s a complete dump of the setup of your computer, logs, installed software, memory and disk configuration, etc.. Everything a tech, or hacker, might wish to know about your system. Why was this file suddenly popping up on my Mac?
I turned to the Oracle of Google for guidance, and soon found out that this report was the output of a Terminal command called sysdiagnose. The man page writeup says:
sysdiagnose — gathers system diagnostic information helpful in
investigating system performance issues. A great deal of information
is harvested, spanning system state and configuration. sysdiagnose
needs to be run as root.
That would explain the report’s contents, but why was this command getting run at all? Especially since it required Root access? I read a bit further, and the description for the command then noted:
sysdiagnose can be triggered upon pressing a special key chord;
this is currently Control-Option-Command-Shift-Period.
That five key combination was certainly not one I’d ever heard of, nor was it something you were likely to hit by accident. But then I looked at my keyboard, and the six keys in the lower right area next to the spacebar are:
Control-Option-Command-Shift-Slash-Period
The spacebar and those keys just to its right are exactly where Fudge’s furry butt gets placed when he lies on my desk. One well placed rump would depress all those keys (plus a few more), and since the command takes a few minutes to run the output doesn’t appear immediately. I tried it, and it worked. Well I’ll be.
Mystery solved, with no nefarious spyware involved. I’ve now learned about a completely new, feline-assisted diagnostic tool on my Mac. And – for a change – Fudge actually was being helpful typing on the computer for me!
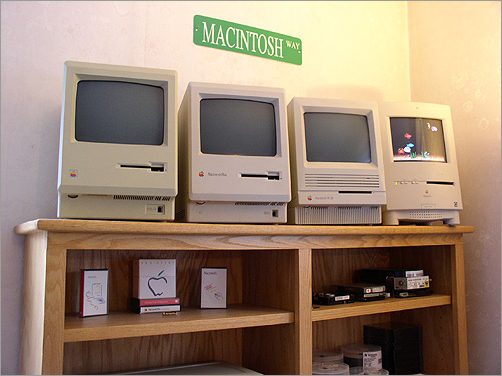
The Color Classic is one of those Mac models which I remember appreciating when it was current but didn’t feel it was worth the money. Putting a color screen into the original compact Mac case always seemed an obvious step, but by the time this model was released in 1993 the Mac II line had been out for several years and Apple was beginning to ship the Quadra/Centris 68040 based systems. Why would anyone want an underpowered machine with such a small screen?
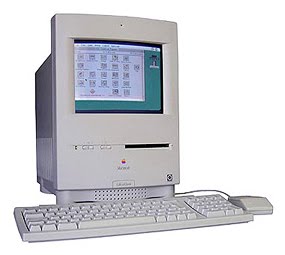 Fast forward twenty years and this little underpowered Mac has become a pleasant reminder of simpler times past. After a four year on-and-off process (mostly off), I finally have a working model in the Vintage Mac Museum, though it took some effort to resurrect.
Back in 2008 a friend of mine found a Color Classic sitting unloved in an antique shop down in Florida. I had recently bought a house and she knew I collected old Macs, so she bought the system for me as a housewarming gift. The unit did not work, it had been sitting for too long in a salty humid environment. The logic board was corroded and missing a few pieces. Still having lots to do with my move I put the Mac on a closet shelf and let it sit for a few more years.
Recently I decided it would be cool to see if I could get things running, but I didn’t want to spend too much money on the task. Working Color Classics sell for about $300 on eBay, but logic and power supply boards sell for around $100 each. After losing a few auctions to last minute eBay “snipers” (I really hate this tactic), I found another board listed with a Submit Offer and arranged to purchase it for a fair price. As part of the arrangement I sent my old non-working board to the seller for him to repair and resell, so a good deal for us both.
The Color Classic, like the Performa 6400 & PowerMac 6500, has a wonderful slide out logic board design: remove a rear case panel and just pull the whole unit out. The designers of the Mac Mini should be forced to learn from these systems. I put in the new board, turned on the power switch at the rear of the machine, and… nothing. A faint whine from the unit, but no other chime or activity.
Bummer. Or so I thought. When mentioning this to the eBayer who sold me the board, he suggested my ADB keyboard or cable might be bad and the Mac wasn’t getting the power up command from the power button on the keyboard itself. I blushed across the internet.
I had forgotten that this old model, like other Macs of that era, use both the physical power switch and the soft power switch on the keyboard. I pressed the keyboard switch and CHIME, the Mac powered up! Even experienced Mac folk sometimes forget the basics…
The Color Classic emitted a few slow beeps, then displayed the blinking folder with question mark. Ah, it just needs a new startup disk, that I can handle. I took the case off, laboriously extracted the old SCSI hard drive, and formatted a new drive. Mac OS Standard (HFS) format is required, 68k Macs can’t read Mac OS Extended (HFS+) disks. Once ready I copied a working System 7.1 install from a Mac IIci to the disk, then installed the drive back in the Classic.
Chime, whir, happy Mac face (yay!), then an error: The version of System 7.1 installed on this drive will not work with this Mac. A newer version is required.
Strange, System 7.1 was the original software which came with this model. Since removing the internal drive was difficult I formatted another hard disk, installed System 7.6.1, and connected this in a case to the external SCSI bus. No dice, the Mac would not boot off the external disk. I tried System 7.5.5 – same result. I tried the System 7.1 and System 7.6 Disk Tools floppy disks, those too got ejected. I was stuck with a Mac which only wanted to boot off the internal drive, containing a non-working system.
I asked myself how badly I wanted a working Color Classic, took a break, and had a few drinks (etc). Time to call it a day and resume troubleshooting tomorrow.
Eventually I figured out the issues. The external drive wasn’t working because it was a 4GB drive, and in that era you needed a 68040 or PowerPC based Mac to read drives larger than 2GB. The Classic has a 68030 processor. The internal System wasn’t booting because with System 7.1 you needed specific System Enabler files for different models of Macs. The Color Classic needed System Enabler 401.
With all the mysteries solved I re-extracted the internal drive, copied a new System 7.1 with the appropriate Enabler, and put everything back together. Chime. Happy Mac. Welcome to Macintosh. And then: the System 7 desktop on an adorable little 9″ color screen.
Wow, that was harder than I expected.
The Color Classic now sits on a different shelf in my office, with its brethren compact Macs the 512k, Plus and SE/30. After this ordeal I’m now somewhat fond of the little guy. I setup the After Dark screensaver to run the Fish module, it makes a nice little electronic Macquarium. Which is good, since my real Macquarium is still sitting unassembled in my front foyer – a project for another day!
Computer storage media comes in many flavors, from tape to disk to solid state storage. The most prevalent for the past three decades have been disk based formats, including hard disks, floppy disks, and removables like SyQuest and Zip cartridges. Some of these formats have multiple sides – double-sided floppies, multi-platter hard drives, etc. – but this isn’t something you typically need to take into consideration while working.
 Recently I was contacted by a client who had a bunch of 650MB 5.25″ MO cartridges he wanted to transfer. I hadn’t worked with this format before and didn’t have a drive around, but was able to find a unit on eBay for a good price. I ordered the drive and my client arranged to stop over and drop off the disks (he was local to the Boston area and wanted to see the Mac Museum).
MO cartridges are similar to 5.25″ Bernoulli and SyQuest formats, they have a hard shell with a sliding disk cover you insert into the drive slot. When my client arrived with his cartridges I noticed they were labelled with A and B sides, each containing different data. I asked “do you have to flip the disks over to access the second side”? Yes indeed, said my client.
Flipping a piece of media over to play the second side is uncommon for data storage formats. Audio and video media use double sided media all the time: records, cassettes, LaserDiscs, DVDs, etc.. When side A is over you flip the disc or tape over to access side B. But with computer media you typically just insert, use, then eject. This format was an unexpected anomaly.
So my client’s six MO cartridges actually contained twelve different volumes of about 320MB each. And true to what I remembered from my use of MO drives back in the day, they are relatively pokey performers. The format offered more storage capacity than contemporary hard drives at affordable prices, but speed demons they weren’t.
Welcome back to the future. Now flip the disk over…
“It’s about time.”
-Talking Moose

I’ve been making a lot of use of the Museum’s Mac Plus lately, a few projects at Oakbog have kept the old beast (and the Moose) busy. Both jobs involved getting things working with System 6 or investigating behavior of the System itself. Along the way to rediscovering how things used to work I had a chance to use two old friends who’ve sat dormant in my Software Archives for ages.
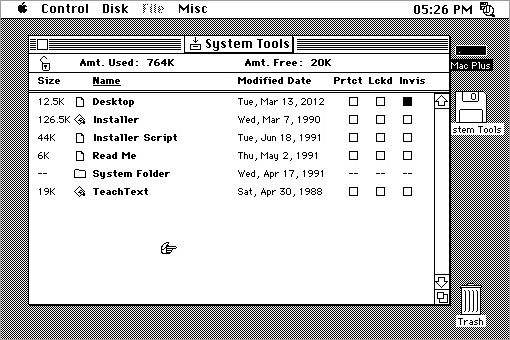
The first job required details on how System 6 worked during startup and the operating system files involved. Apple has long used both visible and invisible files for OS management purposes, including the Macintosh Desktop file which is a disk directory. I needed a list of all files, visible and invisible. On a modern Mac running OS X I could just fire up terminal and do a directory listing, but no such option exists in System 6.0.8.
After a bit of rummaging through my Utilities Software Archives I came across MacTools, which I remembered as being fairly useful back in the day. Not even sure if its compatible with System 6, but I fire it up and voila, a listing of all files by drive – with a tickbox if invisible! Perfect.
Unfortunately there is no way to Save the listing to a file, I can only Print to hardcopy. So instead I made use of the Mac’s Capture Screenshot feature (CMD-SHIFT-3) and saved a few images to the hard drive. How cool is it that this key command still works to this day in all versions of Mac OS X?
Think I’ll leave MacTools on the hard drive, could be useful again.
Concurrent to this I’ve been assisting another client with putting his own inherited Mac Plus back into service. He needs a way to transfer files between the old Mac and a modern one. After some discussion we decided that Zip disks would be a good way to proceed, using a SCSI Zip drive on the Plus and a USB drive on the modern system. My client obtained the drives, but the Zip requires an Iomega System Extension (or INIT) to load at boot time before disks will mount.
I sent him the extension from my Mac Plus on a double sided floppy disk. A few days later my client emails me that he got the software, but his Mac found a virus on the disk. Something like “vdef or wdef” Wow, how long has it been since I last even thought about classic Mac malware?
Another trip to the Utilities Software Archive, and out comes Disinfectant. This was the Norton AntiVirus of its day. Do a scan of the Mac Plus hard drive, and whadd’ya know, the Desktop file is infected with WDEF! Fortunately the recommended fix is easy: reboot the Mac and rebuild the desktop file (CMD-OPT at startup). After rebuild I scan again, and the infection is gone.
To be safe, I run scans of my Wallstreet, PowerBook 540c, and the Software Archives folder itself. A smattering of WDEF and nVIR.A infections are found and fixed. Nothing that ever caused any problems, but hey may as well vaccinate.
Think I’ll leave Disinfectant on the hard drive too. Nice to see you again, fellas.